somewhere to talk about random ideas and projects like everyone else

stuff

#blue

October Progress Update 31 October 2013

It’s Halloween, and I still haven’t posted a monthly blog post and I don’t quite feel like retroactively posting something next month. I’m understandably quite starved for free time with my attempts to reconcile sleep with college with social interaction- and from the looks of it, I probably won’t be able to publish the blog post that I’ve been working on for the better half of this month before it the month ends.

For the past five days, I’ve started using an actual laptop- a late-2013 Macbook Pro Retina 15” (yes, I made it through the better part of two months of college without a laptop more sophisticated than a 2009-era Chromebook). Aside from the obligatory setup process and acclimation to the new operating system, and a mild bout of screen-size-anorexia (which with proper counseling, I’ve more or less recovered from- the 13” is actually somewhat small, but I still can’t quite shake the feeling that 15” is a smidgen too big), the process has been quite painless.

Getting a laptop slightly more capable than the Series 5 Chromebook (not the beefier Celeron model, the original Atom) is a quite long overdue change. I participated in my first hackathon (incidentally also the first time I’ve really written code since the start of the school year) during the beginning of the month. By the end of that 32-hour stretch, I did yearn for a functional trackpad, larger screen and more performant setup. But my shining knight in Unibody Aluminium armor would not have come until three weeks later. But I don’t think the productivity gains would have affected things too much- even with this dinky setup, the prototype scored the second place trophy.

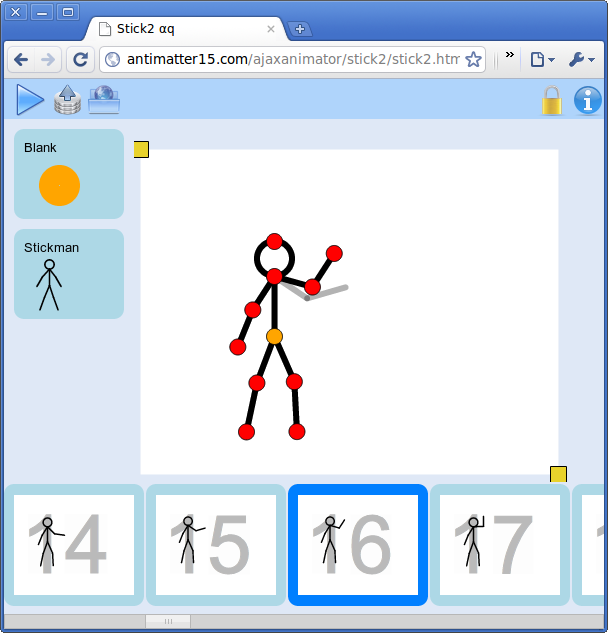
The exact subject of the project was actually discussed briefly in the last progress update, on that long list of projects which I’ve yet to start. That night, I had actually taken the initiative to do a proper port of some Matlab implementation of the Stroke Width Transform. I hooked it up as a content script which would listen for mouse events over image elements and search for textual regions and draw semitransparent blue boxes where appropriate, and connected it to a node backend which would run tesseract to recognize characters. By the end of it all, I had enough for a pretty impressive demo.

Intermittently for more or less the entire month, I’ve been trying to improve the project- replacing some of the more hacky bits with more reliable implementations. I’ve read about some more algorithms, and experimented with different approaches to improve the method. I’m trying to add more stages to the text detection algorithm, such as the ability to segment an image into different lines, and improve the process of splitting lines into characters beyond mere connected components. But the process is rather tedious and with my limited free time, the project remains quite far away from public availability.


Recoloring Planck Data 30 April 2013

Recolored and Merged OnWhite Thumbnail

The rationale behind this is actually pretty contrived, but one of my friends had an imminent birthday, and I had no idea what kind of present to get her. Incidentally she sent had been working on some project and sent me a copy to look over- a request that I honored by perpetually promising to get to it eventually. Sure, it was interesting enough, but several months elapsed and I was beginning to face the fact that I would in all likelihood never actually get to it (kind of like my bottomless Instapaper queue from three years ago)- but that resounding guilt instilled the notion that somehow she liked astrophysics (the paper was something on Perlmutter’s Nobel). So in the absence of any other good ideas, I decided to get her a giant printout of the classic WMAP CMBR.

Soon after finding a poster for sale off Zazzle entitled the “Face of God“ (a particularly poetic pantheistic epithet), I found out that only a week earlier the European Space Agency had published the results of their Planck probe- a substantially higher quality rendition of the cosmic microwave background. So the solution would be simple, I’d just take that new, clearer image and upload it to that poster-printer under some clever title like “Face of God- Dove Real BeautyTM“, as if the NASA’s WMAP is some kind of odd gaussian girl trope.

Original OnWhite Thumbnail

ilc_9yr_moll720-300x150

But the ESA’s Planck coloring is for some unfathomable reason particularly ugly. Sure it has a kind of crude appeal reminiscent of some kind of yellowed 14th century cartographic map with its tan speckled shades of color, but in general, it’s just kind of ugly. Maybe it’s five hundred million years of evolution that makes me particularly predisposed to the blue-green aesthetic of leafy flora and the azure sky. Also, for sake of recognizability, the WMAP data has made its fame with that particular coloring, it’s kind of unreasonable to expect someone to recognize it even after the color scheme has been changed.

The task of recoloring it was actually pretty simple, I just had to locate a legend for the respective graphs- a solid gradient which spans from the cool side to the warm side (the actual range of the data is only ±2mK so there isn’t in this case a massive difference between cool and warm). After crawling through a handful of scientific publications, it’s easy enough to find one and take a screenshot.

wmap
planck-small

The difference in width is actually a kind of useless distinction, an artifact of the resolution of the paper or image I extracted the gradient from. It’s kind of interesting because I don’t really have any idea what the mathematical basis of these gradients are. The WMAP one looks like a simple rainbow so it may just be the colors arranged in progressively increasing wavelength, while the ESA coloring appears to be some kind of linear interpolation between red, white and blue (if the nationalities were inverted, one might be tempted to say murrica).

But once the gradient is established, it becomes the trivial task of mapping the colors of one image to another, something that I kind of hackedly accomplished with a Python script using PIL (It took a minute or so to process the 8 million pixels, but that’s not really too bad). And then, because the ultimate purpose of my project wasn’t so much to attain scientific accuracy as feigning it with some kind of better aesthetic, I went to GIMP and superimposed a translucent copy of the WMAP data so the image isn’t quite so speckled and the larger continental blobs more apparent.

Here is the poster if you want it. And the resulting 6.1MB jpeg.


stick figure animator 22 June 2010

One thing the ajax animator’s pretty bad at is stick figures. Sure it’s not impossible, but it can’t really compare with the ol-fashioned frame-by-frame joint-manipulation likeness of Pivot. It’s called stick2 because the original experiment with stickfigures was named stick.html, and when I went to extend it and didn’t feel like setting up a git/svn repo, I copied the file and named it stick2.html, and with no good project-naming skills, it stayed that way.

Anyway, this was a project that got pretty close to completion in early march, but I never bothered to blog about it until now. It should work pretty not-bad on an iPad J(except the color picker), though honestly, I’ve never tried it.

The interface is pure jQuery/html/css. The graphics are done with Raphael, but the player actually uses <canvas> for no particular reason.

Basically, it’s organized into two panels, the left-side figures-box and the bottom timeline. The figures-box contains figures (amazing!) and clicking on them adds them to your canvas. The two defaults are the pivot-style stickman, and something called “blank” which is a root node with no additional nodes. Though it shows up as a orange dot, unless you add something to it, it doesn’t have any actual look when viewed in the player.

On top is the context-sensitive buttons. Well the buttons in my screenshot aren’t context sensitive, they’re permanent. But when you click on a node, a new set of buttons (and words too!) appears. One is a line and the other is a circle. Click them to add a new segment or circle to the currently selected node. Then are various settings for the current segment (each node other than the root one is associated with a segment). Clicking those allows you to modify them. Also, a red X appears on the right, and that basically means remove the node and the child nodes.

So, now you have some extra nodes, how do you change them? Simply hold it down and drag, and the the segments move as well. But note that the length of the segment doesn’t change as you move it. That’s because by default, it locks the length of the segments. There are two ways to get around it. The first is to hold shift while dragging. The second is to tap the little lock icon on the top left.

On the bottom, is the timeline with live-previews of your frames with a semitransparent gray backdrop of numbers. Switch between each one by clicking on them and add one at the end by hitting the green “Add new frame” button.

On the canvas, there are two yellow squares, those allow you to resize the canvas.

On the very left of the top toolbar, is the play button. Hit it and the figures toolbox minimizes and it plays out your animation. Click it again to get back. Then is a little upload button. Hit it and then a little box pops up with a link to where you can find your animation in a way that you can share and to edit (not actually edit, but more like fork, as each save is given a unique id). Next is the download button which you hit, and get prompted by a big prompt-box which you use to paste in the ID of the animation you (or someone else) has saved, so you can edit it. Most of the time that’s useless as when you send a link with the player, it has a button which says “Edit”.

Sample animation: http://antimatter15.com/ajaxanimator/stick2/player.html?rlsm4lx14c

Try the application out: http://antimatter15.com/ajaxanimator/stick2/stick2.html

Code: http://github.com/antimatter15/stick2