somewhere to talk about random ideas and projects like everyone else

stuff

#multitouch

Determining if a Mousewheel Event Results in Scroll 14 August 2012

So here’s a somewhat technical post, actually it’s pretty technical. But either way the premise is sort of simple to understand, and probably so is the context. I’m working on Swipe Gesture 2.0, which basically tries to take Chrome and Safari on OS X Lion’s awesome back-forward transitions and make them work on other operating systems. See, the thing is that multitouch isn’t _strictly _a requirement for it to work, a lot of computers just have the little bars on the bottom and right of the track bar (often with a little somewhat abrasive textured surface so you don’t accidentally tread upon it). Regardless, the title is a bit of a misnomer, because even though the event is called the “mousewheel”, it’s hardly meant to be observed from an actual mouse (or a wheel), instead it means the scrolling gesture on some kind of trackpad, either multitouch or not.

Well, first, I guess I’ll talk about the difference between how Lion and Leopard do it. The way Leopard did it was pretty cool but not particularly applicable to other platforms since it relied on the existence of a three-finger gesture. As in, you needed some kind of touchpad which was cool enough to support three-finger multiouch, reliably. It also behaved completely independent of the current zoom or scroll position, which makes implementation in software entirely trivial given access to some drivers which can recognize three fingers on a touchpad.

Lion did it a completely different way. Instead of creating an entirely new gesture which was entirely dedicated to the singular task of navigating through history, it conflated the notions of scrolling with navigating, which sort of makes sense. Apple’s quite dedicated to skeuomorphic metaphors, and they want to treat the web more like literal pages. A user can move it around to better keep certain things in view, and the physical movement to slide a sheet out of view is just an extension of that panning gesture.

However, technically this poses a completely different challenge, because this requires you to distinguish between scrolls and navigation requests. Scrolling is always the default behavior, but the navigation swipe gesture happens when scrolling wouldn’t actually result in anything. However, many implementations of scrolling are at least somewhat kinetic, often it’s emphasized in software (in the form of smooth-scrolling) or hardware (scroll wheels that don’t click but instead move basically freely) or because your arm has to obey the laws of kinematics (unless it doesn’t, in which case that’s certainly fascinating). So not only does the software have to determine when a mouse wheel action results manifests as a scroll, it has to see if it was the user’s intent to do the extraneous scrolling.

This is done by clustering the mouse wheel movements together temporally. Scroll events flow in in discrete chunks, and you can split events off into little buckets (in a sense), where if there isn’t any event sent within some arbitrary threshold (say, 500msecs or half a second), you stick stuff in a new bucket. This way, lets say you scroll from the top of the page to the bottom and you’re sort of excited, and spin the wheel as fast as possible, you hit the bottom of the page but it’s not some instant stop. You continue scrolling (because you’re just that excited, and just can’t stop) for a little bit more. Ignoring the fact that you probably won’t have a vertical/horizontal event handler (though there are some sort of intriguing possibilities for this, one idea is to have the upper threshold trigger full screen). Without segmenting them into certain buckets, it doesn’t recognize that the time when you’re ramming into the top of the page is part of the same general gesture as when you were scrolling, and it may interpret that as an intentional gesture. So that’s one part which makes it a bit more complex.

So now, you have these series of mousewheel events conveniently delimited into little gesture-chunks. The next part is determining whether or not the gesture-chunks are part of a scroll action or not.

Thankfully that’s a really simple thing to do. Just look at the document’s scrollTop and check if it’s zero (or scrollLeft for horizontal stuff) or whatever value is the width of the element. If it can’t scroll no more, then you have a winner and you can start the falling balloons and confetti.

Except it’s not that easy, because the document isn’t the only thing which can scroll. Thanks to the glory of overflow:scroll, there are lots of things which can scroll. Things which aren’t necessarily documents may be in arbitrary scroll positions to wreak havoc on your well-meaning heuristics.

So back to the drawing board, I guess. Actually, to think of it, maybe it’s simpler to listen for the scroll event, which fires when a scroll happens, and quite intuitively doesn’t fire when a scroll doesn’t happen. And mouse wheel actions always precede scroll ones (because the wheel events bubble and are cancelable, so you can prevent a scroll from happening). The only problem is that scroll events don’t bubble. As in, when a scroll event happens on some element, it’s not going to show up on the document, it’s only going to show up if you’re listening on that specific element at the right point in time.

The naive approach to this dilemma is just to attach a scroll listener to every single event on the document, and to reattach to some other elements whenever the DOM tree is modified in some way. This means the overhead grows rather significantly when pages are larger, in a way which could be likened to O(n) time where n represents the number of nodes in the document. If you want, you could lazily do it by attaching the scroll listener only once the wheel event has fired, but that would cause a significant delay when attempting to legitimately scroll.

Another thing you could do, is to make another assumption: that the element which gets scrolled has to be some parent of the element which the mouse is currently over. Making that assumption, we can add a mousewheel listener to the root of the document, as those kinds of events actually do bubble. And since they’re mouse events, once you capture it, you can get a clientX and clientY, comprising the current coordinates of the mouse. And with that, you can get the element immediately below the cursor with document.elementFromPoint. And since the scroll might fire on any one of the elements which are parents of the current element, you ascend up the tree and add a listener on all of those (until, of course you hit the document element, at which point you can’t go any further up). This yields performance which could essentially be modeled with O(log n), quite a bit better than O(n).

So now the finished process is fairly simple, you listen for a mousewheel event, and when it happens we determine the element, and ascend the tree, yada yada. That scroll listener, when fired, sets a global variable lastDetectedScroll to the current timestamp. We set a little temporary variable set to the before time and then we set a little timer, 150 milliseconds. It usually only takes like four to see if a scroll thingy happened, but let’s be safe by having an order-of-magnitude threshold. The Cuckoo clock rings, and we check if the lastDetectedScroll is the same thing, and if it is, it’s a swipe, and otherwise, it’s a scroll.

Here’s a little demo: http://antimatter15.com/misc/experiments/swipe-gesture/minimal.html

Swipe Gesture for Chrome 13 August 2012

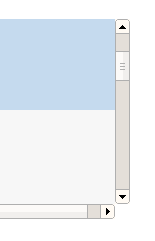
Here’s an extension which I actually released some time back, but never got around to writing a blog post for. Part of the reason was that the early reviews didn’t quite pan out, in large part due to not working. But I was using my Chromebook and I somehow felt a vague longing for some kind of multitouch gesture, and remembered that I had made this little extension (which I had disabled for some reason). Anyway, this is as appropriate a time as any to formally announce it to my probably remarkably small blog readership.

There is, however a tad bit of difficulty representing the function of it in pictures because really, it doesn’t have a big UI. It makes hardware more useful, and in its idealized form, should have no interface. But of course, we don’t live in a place where apps are perfectly idealized and either way, Apple has plenty of nice pretty pictures of people swiping fingers to the right.

I really fell in love with the Macbook multitouch gestures, almost at first sight. They just seemed so natural and so beautiful that I sort of felt that that was like the epitome of design or HCI perfection. And from that point, any time I used a laptop which wasn’t made by Apple (or even the ones which were made by Apple but were stuck in the barbaric ages preceding the inclusion of the glass multitouch pad, where its invention might have produced a scene like this), I felt thoroughly disgusted.

Flipping through the Chromium OS design papers, there is one page dedicated specifically to cool multitouch gestures which could be used. And as far as I’m aware the Samsung Series 5 550 (the new chromebook) is the only device which supports these gestures (thus far), and even then it’s only pinch to zoom and forward/back (three finger). All the other Chromebook users have been left out.

Another cool thing about the implementation is that it uses a certain webkitDirectionInvertedFromDevice property of the mousewheel events, which gives you a boolean value about whether or not the platform you’re on has some magical direction inversion like on OS X Lion or if you’ve enabled “simple scrolling” on Chrome OS. But this might not have been a good idea since swipe directions too are sort of inverted on those platforms naturally as well, so it might be better to _not _compensate for it.

Anyway, the implementation is actually quite simple. The current version doesn’t even break the 40 line mark, because all it does it it listens for mousewheel events on every page (via a content script), and it calculates the current acceleration. If that acceleration ever passes a certain threshold, it triggers a forward or back action. Right now, the threshold is preconfigured based on my own testing on a Samsung Series 5 (note, not 550) chromebook. But for people with other devices, I’m working on a second version which will be slightly more Apple-esque in its implementation.


Chrome Multitask Mode for Real with Multi-Pointer Xorg 04 April 2012

Google’s multitask mode was only an April Fool’s joke, but inordinately amused among us (read: me) might even venture into attempting such an irrational feat. While watching the video, it evoked some memories of something which I had stumbled across a few years ago, called Multi-Pointer X. The rationale for creating that wasn’t nearly as insane as the Chrome Multitask video made it out to appear, instead I think it was just the framework to support multitouch and other sorts of alluring interactions on the Linux platform.

So I decided to look into that again and within a few minutes of Googling, it appears that Multi-Pointer X has now been incorporated into the X.org mainline as part of XInput2. So what exactly does it take to conjure and insult the multitasking gods?

The first step is quite logically to plug in another mouse. I happen to have three mice plugged into my computer anyway (there’s a perfectly logical rationale for how this came to be, my keyboard is some wireless Microsoft keyboard+mouse set but I really hate the scrollbar on the Microsoft mouse, so I instead used another mouse for the longest time until it started failing and sheer lethargy prevailed over disconnecting that obsoleted peripheral) but regrettably, I don’t have an additional prehensile appendage to operate the third mouse.

Right now I’m using a pretty much unmodified version of the latest version of Ubuntu 11.10. I just opened up a terminal window and typed in “xinput list

antimatter15@antimatter15-desktop:~/online$ xinput list
⎡ Virtual core pointer id=2 [master pointer (3)]
⎜ ↳ Virtual core XTEST pointer id=4 [slave pointer (2)]
⎜ ↳ A4Tech PS/2+USB Mouse id=8 [slave pointer (2)]
⎜ ↳ Microsft Microsoft Wireless Optical Desktop® 2.20 id=11 [slave pointer (2)]
⎜ ↳ USB Laser Wheel Mouse id=9 [slave pointer (2)]
⎣ Virtual core keyboard id=3 [master keyboard (2)]
↳ Virtual core XTEST keyboard id=5 [slave keyboard (3)]
↳ Power Button id=6 [slave keyboard (3)]
↳ Power Button id=7 [slave keyboard (3)]
↳ Microsft Microsoft Wireless Optical Desktop® 2.20 id=10 [slave keyboard (3)]

Use the command “xinput create-master Auxiliary“ in order to create a new input device, and try running “xinput list“ again to confirm that the command has done your bidding.

antimatter15@antimatter15-desktop:~/online$ xinput create-master Auxiliary

Now it’s time for the third (or is it fourth) and final step, to reattach one of those master pointers into the auxiliary pointer. To do that, pick out some mouse. For me, I picked my “A4Tech PS/2+USB Mouse“ which is was my mouse with a broken scroll wheel. You can see that it’s been given ID=8, so that’s the number I’ll be using for the next step.

antimatter15@antimatter15-desktop:~/online$ xinput reattach 8 "Auxiliary pointer"

And then I can now use two mice at the same time for whatever ungodly purpose I desire.

It’s hard to take screenshots since it appears that every screenshotting or screencasting app which I can find seems to make the wholly unwarranted assumption that a desktop computer only has one cursor, but it does actually work. Though I don’t think I’ll ever be able to multitask through this scheme, it’s mentally jarring in far too many ways.


ShinyTouch/OpenCV 15 July 2010

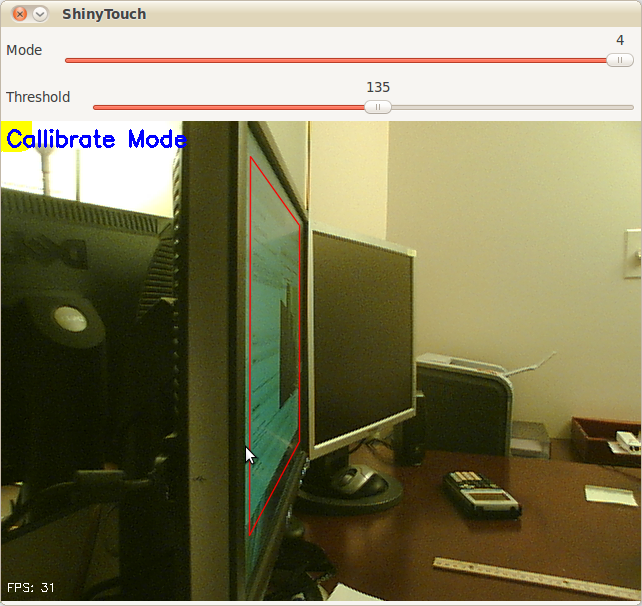
I have yet to give up entirely on ShinyTouch, my experiment into creating a touch screen input system which requires virtually no setup. For people who haven’t read my posts from last year, it works because magically things look shinier when you look at it from an angle. And so if you mount a camera at an angle (It doesn’t need to be as extreme as the screenshot above), you end up seeing a reflection on the surface of the screen (this could be aided by a transparent layer of acrylic or by having a glossy display, but as you can see, mine are matte, but they still work). The other pretty obvious idea of ShinyTouch, is that on a reflective surface, especially observed from a non-direct angle, you can see that the distance from the reflection (I guess my eighth grade science teacher would say the “virtual image”) to the apparent finger, or “real image” is twice the distance from either to the surface of the display. In other words, the reflection gets closer to you when you get closer to the mirror. A webcam usually gives a two-dimensional bitmap of data (and one non-spatial dimension of time). This gives (after a perspective transform) the X and Y positions of the finger. But an important aspect of a touchscreen and what this technology is also capable of, a “zero-touch screen”, is a Z axis: the distance of the finger and the screen. A touchscreen has a binary Z-axis: touch or no touch. Since you can measure the distance between the apparent real finger and it’s reflection, you can get the Z-axis. That’s how ShinyTouch works.

Last year someone was interested and actually contributed some code. Eventually we both agreed that my code was crap so he decided to rewrite it, this time using less PIL and pixel manipulation, and instead, opting for more OpenCV so it’s faster. The project died a bit early this year, and with nothing more to do, I decided to revive it. His code had some neat features:

  • Better perspective performs
  • Faster
  • Less Buggy
  • Simpler configuration (track bars instead of key combinations and editing JSON files)
  • Yellow square to indicate which corner to click when callibrating (actually, I wrote that feature) It was left however, at a pretty unfinished state. It couldn’t do anything more than generate config files through a nice UI and doing a perspective transform on the raw video feed. So in the last few days, I added a few more features.

  • Convert perspective-transformed code into grayscale

  • Apply a 6x6 gaussian blur filter
  • Apply a binary threshold filter
  • Copy it over to PIL and shrink the canvas by 75% for performance reasons
  • Hack a Python flood-fill function to do blob detection (because I couldn’t compile any python bindings for the opencv blob library)
  • Filter those blobs (sort of) Basically, it means ShinyTouch can now do multi-touch. Though the Z-axis processing, which is really what the project is all about still sucks. Like it sucks a lot. But when it does work (on a rare occasion), you get multitouch (yay). If TUIO gets ported (again), it’ll probably be able to interface with all the neat TUIO based apps.

Code here: http://github.com/antimatter15/shinytouch/ Please help, you probably don’t want to try it (yet).


New Idea Insanely Cheap Multitouch 14 March 2009

So I’ve been thinking about a new design for a Multitouch system. I’ve googled it a bit, and it seems original.

Right now, there are a couple popular multitouch designs. The most popular one right now is probably FTIR, or Frustrated Total Internal Reflection. This is the one used by Jeff Han in his TED demonstrations. There are several variations of FTIR, like Diffused Surface Illumination. Then there is Diffused Illumination, which powers the Microsoft Surface, and a variation of DI is Front DI (where the light source is in front) like the simple DIY MTmini system (where the light source is ambient light). The problem with FTIR, DSI, and DI is that they require the camera to be in the back of the screen. This makes it impossible to retrofit a surface.

The Wiimote tricks by Johnny Chung Lee aren’t exactly multitouch. They involve wearing special things to interact. They are interesting nonetheless, but not true multitouch. It’s virtually a completely different market, though the Wiimote IR camera may be used with the LaserTouch system theoretically instead of the camera (I was planning to try this out originally).

Laser Light Plane, or LLP is usually similarly used as the ones above. A variant of LLP is the Microsoft Research LaserTouch system (apparently used in Touchwall as well). In LLP, a laser hooked up to a line generator creates a “plane” of infrared light only millimeters above the surface. When something interacts with that plane, light is scattered in all directions. Most systems take light from the bottom, but LaserTouch looks at the light from the top. Wherever your finger touches the plane, it appears to have something like a thin halo around it.

LLP is interesting (especially the LaserTouch variant) because it allows for comparatively really cheap multitouch. The Aixiz 780nm 5-10mW laser (the one(s) most commonly used around nuigroup for LLP rigs). cost less than $10 (though normally 4 or so are used together, and buying goggles for protection from the dangerous light may cost close to a hundred, and the visible light filter is also a slight tax, along with disassembling a webcam to remove the IR filter, making it closer to the $100 estimate by microsoft).

Well, I have a relatively simple idea. You just have a very thin mirror angled just right off to the side of the surface (actually, 2 mirrors, for two coordinates). You are probably thinking that this is only going to be like the normal single-touch systems, which suffer from not being able to detect where you actually pushed when there is multiple points. Actually, the mirrors are only used to determine whether you’ve contacted the screen yet. The position is determined by some magical image processing that hasn’t been implemented yet.

So what do you think of this idea? Did I explain it enough? I’m probably gonna elaborate on this later.